Frothing milk is a fundamental skill for anyone who wants to take their home coffee-making to the next level.
How to froth milk at home
Whether it’s a silky latte, a rich cappuccino, or a creamy matcha latte, mastering how to froth milk allows you to create velvety microfoam—a far cry from the bubbly, inconsistent foam of basic frothing methods. This key technique transforms your favourite drinks and makes your kitchen feel like a coffee bar.
Creating the perfect balance of velvety milk foam and creamy texture requires more than just the right tools—it’s about technique, precision, and understanding the role that milk plays in enhancing flavour and texture. With a dependable espresso machine, quality coffee accessories, and a little practice, you can create barista-quality drinks from the comfort of your home.
This guide will cover everything you need to know, from choosing the best milk to mastering various frothing techniques. By the end, you’ll have the skills to elevate every cup you make. Let’s begin.
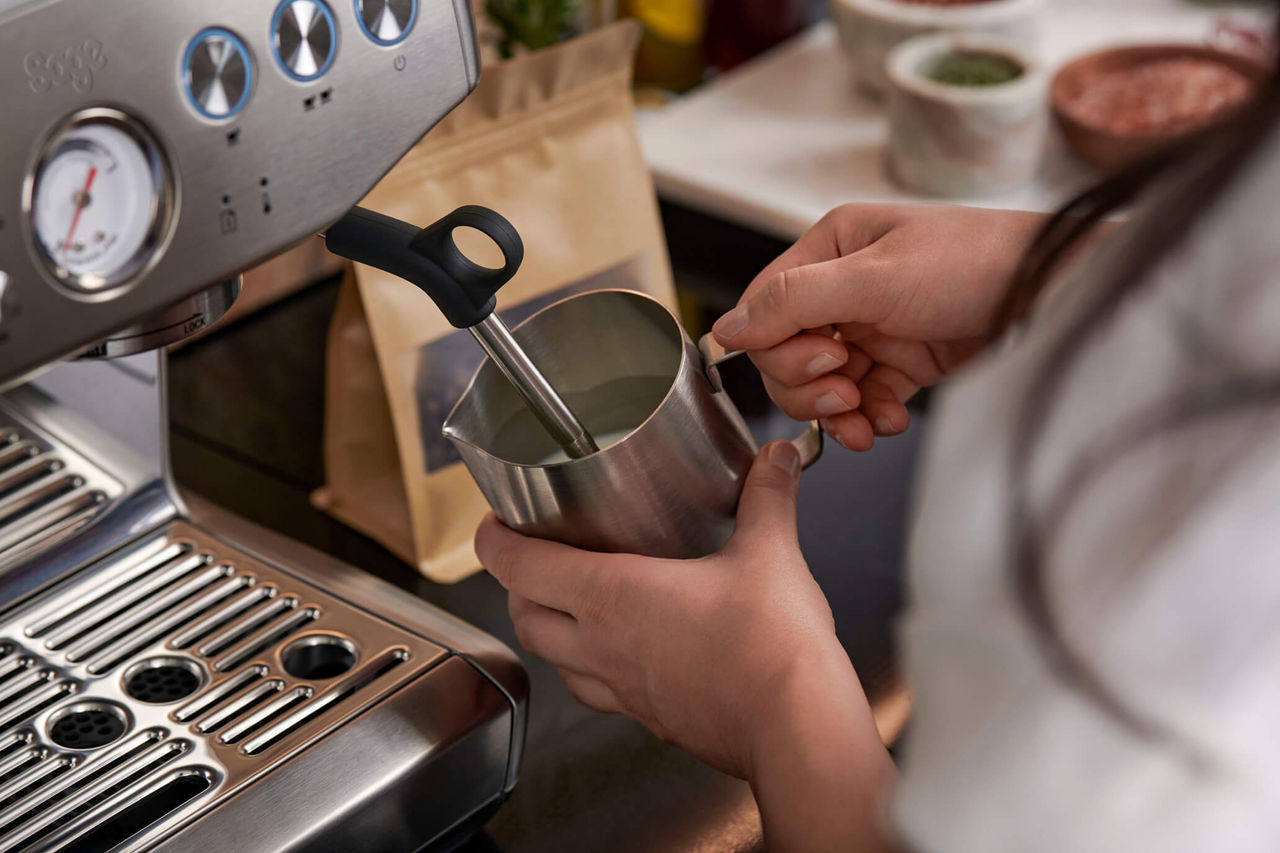
What you need to froth milk
Gathering the must have coffee accessories and choosing the right milk are essential steps for achieving exceptional results. Here’s what you’ll need:
1. Espresso machine with a steam wand: Ensures precise control over steaming and texturing milk. Some of Sage’s machines feature Auto MilQ capability, which simplifies the frothing process by ensuring precise temperature and texture. These innovative espresso machine types are ideal for anyone looking to achieve consistently excellent results with ease.
2. Coffee grinders: Helps achieve the fine grind necessary for extracting quality espresso to pair with frothed milk.
3. Milk jug: A jug with a spout allows for clean, controlled pouring, essential for latte art.
4. Thermometer: Ensures milk is heated to the ideal temperature for sweetness and texture.
5. Milk: The type of milk you use can affect the outcome of your microfoam. For the best results, try a high-protein option, such as oat milk or whole milk, and ensure it’s cold.
Step-by-step guide on how to froth milk
Frothing milk requires a balance of temperature, technique, and timing. Here’s how to get started:
1. Pour cold milk into your milk jug, filling it no more than halfway to allow for expansion.
2. Place the steam wand just below the milk’s surface and turn it on. Slowly move the frother in a slow, circular motion to incorporate air and form foam. Once sufficient air has been added, submerge the steam wand slightly deeper and angle it to initiate a whirlpool effect. This technique helps break up larger bubbles, resulting in a smooth, homogeneous microfoam.
3. Heat the milk to around 60–65°C, ensuring you don’t overheat it, as this affects its sweetness and texture. Understanding how to steam milk for latte drinks will help you create a creamy consistency for professional-quality results.
4. Tap the jug gently on a flat surface to remove any large bubbles, then swirl the milk for a silky finish.
If you don’t have a frother, there are still ways to achieve good results:
● Hand mixer: Heat the milk first, then use the mixer on a low setting to create foam.
● Blender: Blend warm milk on high speed for 20–30 seconds to incorporate air.
● Immersion blender: Heat the milk, then blend in a deep container until foamy.
Experimenting with these methods can give you insights into how to texture milk effectively without specialised tools.
Types of frothing techniques
Different tools produce varied results. Here’s an overview of the two most common methods:
Manual frothers
Handheld frothers are cost-effective and portable. While they require more effort, they can still produce good foam for coffee drinks like lattes and cappuccinos.
Electric frothers
Electric frothers are fully automated, combining heating and frothing in one step. These are ideal for making matcha lattes, tea lattes, or cappuccinos with minimal effort.
Tips for perfecting your milk froth
To get the most out of your steamed milk, try the following:
1. Start with cold milk: Always begin with fresh, cold milk straight from the fridge. Cold milk takes longer to heat up, giving you more time to incorporate air and develop a fine microfoam. The lower temperatures help maintain the stability of milk proteins, facilitating a smoother texture and more consistent foam.
2. Choose the right milk jug: A spouted milk jug is essential for creating precision pours, particularly when making latte art. Look for a jug with a comfortable grip and a pointed spout, which makes it easier to direct the flow of milk and foam into the cup. The right jug can make all the difference when aiming for clean, professional designs like hearts or rosettas.
3. Prioritise microfoam: Microfoam is the smooth, velvety milk texture created by incorporating tiny, uniform air bubbles. Unlike frothy milk, which can feel airy and disjointed, microfoam blends seamlessly with espresso, enhancing both texture and flavour. Aim for this consistency by carefully controlling the steam wand and avoiding large bubbles.
4. Avoid overheating: Have you ever ended up with flat, lifeless foam? Overheating milk can cause the proteins to denature at around 70°C, resulting in a cooked flavor and compromising the foam's quality. To preserve the milk's natural sweetness and maintain stable foam, aim to keep the temperature between 60–65°C. Use a thermometer for accuracy or employ the touch method—when the jug feels warm to the touch but not too hot to hold, it's just right.
Frothing different types of milk
Non-dairy options can sometimes feel tricky, but with the right approach, they produce impressive results. Here’s how popular choices compare:
1. Oat milk: A consistent non-dairy choice, oat milk is great for achieving creamy foam with a smooth texture. It’s a favourite for those seeking plant-based alternatives that feel indulgent.
2. Soy milk: Reliable for frothing, soy milk offers a solid foam structure but may curdle if overheated—keep an eye on the temperature.
3. Almond milk: While lighter than other options, almond milk still creates a delicate foam. It’s perfect for those who prefer a thinner texture or subtle nutty flavour.
4. Coconut milk: Adds a tropical twist to your coffee but can be less stable when frothing. It works well in creative drinks like a coconut matcha latte.
Experimenting with these options will help you find the best match for your coffee preferences. And don’t forget, using cold milk straight from the fridge improves results across all types.
How to use frothed milk in different coffee drinks
Frothed milk enhances a variety of beverages, giving them a luxurious texture. Try these ideas:
● Latte: Combine a smooth espresso shot with steamed milk and a thin layer of foam.
● Cappuccino: Equal parts espresso, steamed milk, and foam create a rich and frothy drink.
● Iced coffee: Use cold foam as a topping for a refreshing, creamy twist.
● Matcha latte: Froth milk to add a creamy layer to earthy green tea.
Troubleshooting common frothing issues
If your milk froth isn’t turning out as expected, here’s how to resolve common problems:
● Bubbles are too large: Lower the wand to reduce airflow, and tap the jug to eliminate bubbles.
● Milk won’t froth: Use cold milk, and ensure you’ve selected a high-protein option like whole or oat milk.
Foam collapses quickly: Avoid overheating, as it destabilises the foam.
Mastering milk frothing
Mastering how to froth milk is more than just a skill—it’s the gateway to crafting café-quality drinks in the comfort of your own home. If you’ve ever struggled with unstable foam or inconsistent textures, remember that practice and the right tools make all the difference. Whether you’re preparing a velvety latte, experimenting with a tea latte, or creating the perfect cappuccino, silky microfoam transforms every sip into a moment of indulgence.
Sage’s thoughtfully designed machines, like those with Auto MilQ capability, take the guesswork out of steaming and frothing, enabling you to focus on refining your technique. With the right setup and a commitment to practice, you can achieve professional results with ease. Start your journey to barista-quality creations today and elevate your daily coffee routine to something truly extraordinary.
Sources:
1. Henry Ford Health. "What Kind of Milk Is Best?" Henry Ford Health Blog. www.henryford.com/blog/2024/04/what-kind-milk-best.
2. Holland, Nina. "How to Make a Latte." Food & Wine. www.foodandwine.com/how-to-make-a-latte-7096050.
3. Jiang, H., Zhang, Y., Xu, J., Wu, X., & Yang, L. (2019). Coffee extraction and its impact on flavor: A review. Foods, 8(6), 1-14. https://pmc.ncbi.nlm.nih.gov/articles/PMC6560105/.
4. The Nutrition Source. "Milk." Harvard T.H. Chan School of Public Health. www.nutritionsource.hsph.harvard.edu/milk/.